GRAB BLINKIE

I STALK


TUBE SITES


Sunday, April 7, 2013
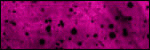
Kawaii Magic Ptu Tut

Kawaii Magic Tutorial
Using the beautiful new tube "Kawaii" from Ninaste
and a ptu scrap kit "Magical Garden" from Hania's Designs
Both of which you can find at scraps and the city.
---------------
To Get Started You Will Need The Following:
Paintshop Pro- i used X4(but any should work)
Tube Choice-as listed above
scrap kit-as listed above
Plugins-Xero(Porcelain, tweaker, bad dream & improver)
Penta(circle dot)
Template- temp206 by Millie(Here)
-----------------------
Open Your template, delete credit and wordart and layer 6(black star) layers.
We are going to start from the bottom and work our way up, remember to rename any new layers you may make with the orinigal layer name so you can refer back to it.
Merge layers 1 and 2 together, open paper05-copy-on your new merged layers-selections-select all-float-defloat-edit-paste as new layer-selections-invert-delete-deselect-go up to effects-plugins-penta-circle dot-standard settings-add drop shadow (black)-rename and delete the orinigal layer.
Go up to layer 3-selections-select all-float-defloat-open paper 1-copy and paste as new layer-selections-invert-delete-add drop shadow black-deselect. Go up to layer 4-slections-select all-float-defloat-open paper7-copy and paste as new layer-selections-invert-delete-deselect-selections-select all-float-defloat-add new raster layer-selections-modify-selections borders-outisde/5-flood fill with white-add noise to your liking-deselect.
Going up to layer 5-selections-select all-float-defloat-open paper 9-copy and paste as new layer-selections-invert-delete-deselect-selections-float-defloat-open your tube choice(close up if you have)-copy and paste as new layer-selections-invert-delete-deselect-change settings to luminance(L)-opacity to 50-duplicate-change to screen-slections-select all-float-defloat-add new raster layer-selections-modify-selections borders-outside & 7-deselect-flood fill with white-add boise to your liking-add new raster layer.
Open element 27-resize 5 %-copy and paste-add new raster. Open element 79-copy and paste x2-add new raster layer. Open element 90-copy and paste-add new raster layer. Open element 24-resize 10%-copy and paste-add new raster layer. Open element 86-copy and paste-add new raste layer. Open element 50-copy and paste-add new raster layer. Open element 48-resize 10%-copy and paste-add new raster layer. Open element 17-resize 10%-copy and paste-add new raster layer.
Open your tube choice-resize to your liking if needed-copy and paste. Merge layers visible-on your background layer-add new raster layer-open element 92-copy and paste-add new raster layer-open elements 57 & 58-copy and paste-add new raster layer-Open element 100-copy and paste x5. You can go ahead and delete your background layer now. merge all layers together now, if you need to resize your tag now is the time to do so.
Go up to effects-plugins-xero-porcelain-change all colors to 0-strength to 73-xero-bad dream- change the settings to 128, 49, 0, 0, 0, -15, -3-xero-tweaker-all to 10-Xero-improver-stadnard settings. Add all correct copyrights-your text and your all done.
--------
DO NOT CLAIM THIS TUT AS YOUR OWN, AS I'VE CREATED IT AS CT FOR NINASTE OVER AT SATC.
DO NOT STEAL, RIP OR CHANGE ANYTHING ABOUT THE ABOVE TAG OR BELOW TAG AS THAT WAS NOT THE REASON OF THESE TAGS. IF YOU USE MY TUT FOR ANY OTHER REASON THAN PU PLEASE LINK BACK TO MY BLOG.
Taggie For Veerjte of Hania's Designs


Subscribe to:
Post Comments
(Atom)


0 comments:
Post a Comment